> ## Documentation Index
> Fetch the complete documentation index at: https://docs.jedify.com/llms.txt
> Use this file to discover all available pages before exploring further.
# Jedify Azure AD SSO setup guide
This guide will help you configure SAML SSO between your Azure Active Directory and our application using the SSO Setup Wizard.
### STEP 1: Start the SSO Setup Wizard
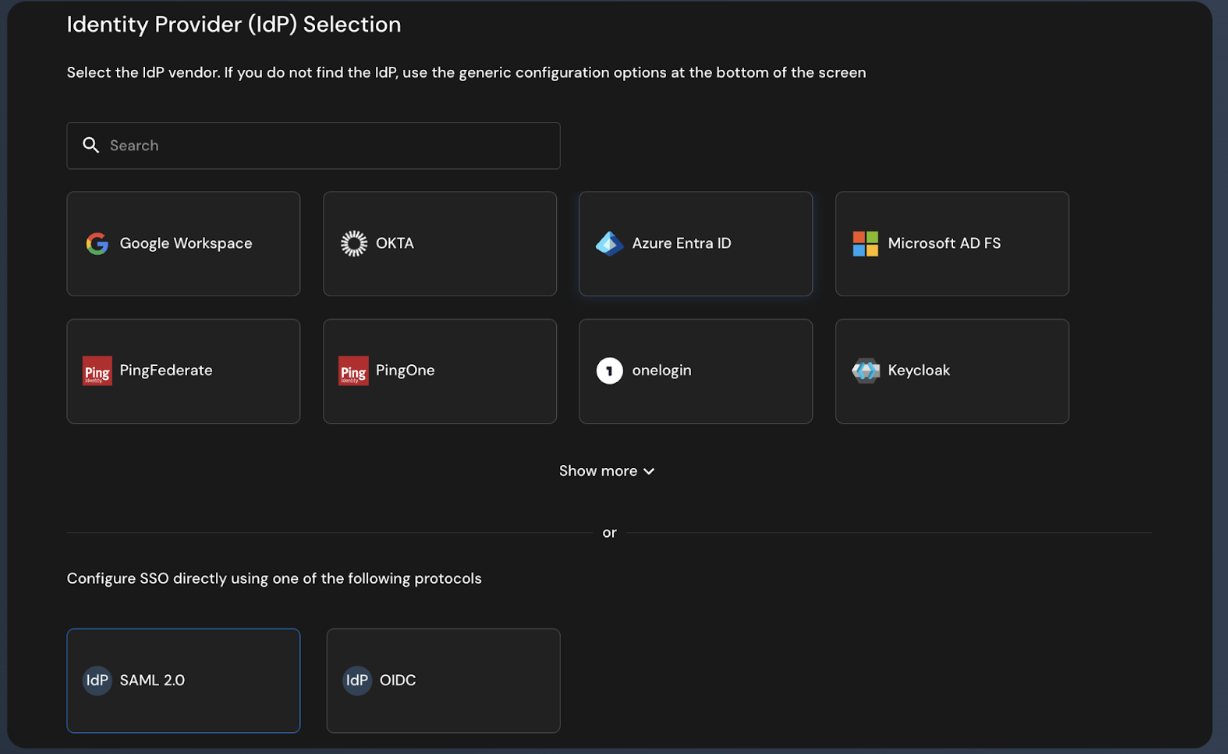
1. Access the SSO Setup Wizard link provided by Jedify.
2. On the Identity Provider (IdP) Selection screen, select "Azure Entra ID"
3. Click Continue
 ### STEP 2: Copy Service Provider Information
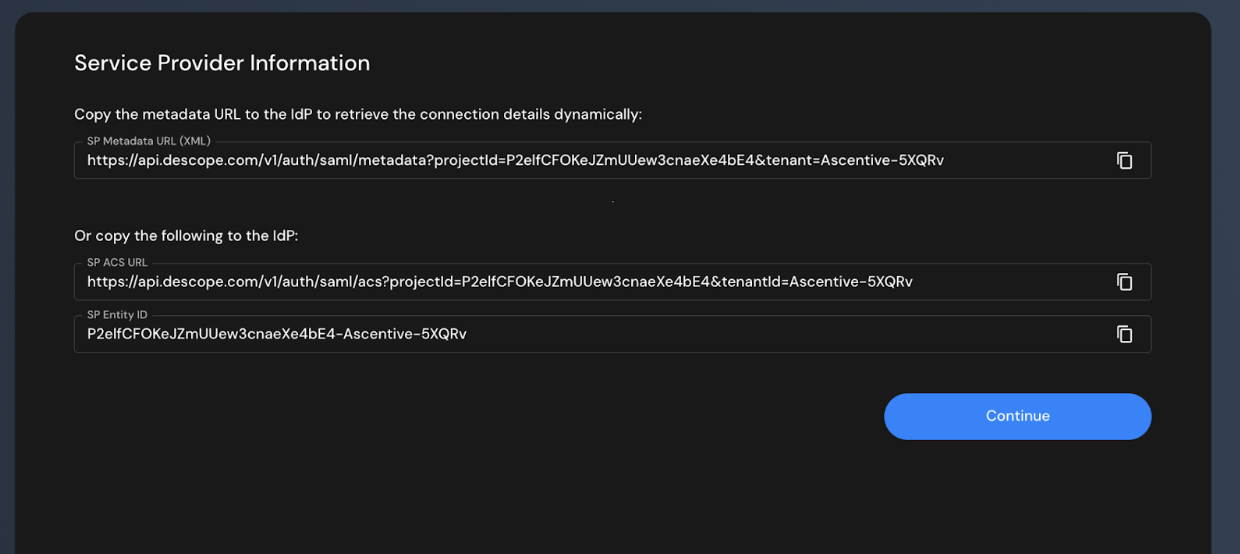
The wizard displays three values you'll need for Azure configuration:
1. SP Metadata URL (XML) - Optional, not needed for manual configuration
2. SP ACS URL - Copy this URL (example: `https://api.descope.com/v1/auth/saml/acs?projectid=.`..)
3. SP Entity ID - Copy this value (example: `P2elfCFOKeJZmUUew3cnaeXe4bE4-Ascentive-5XQRv`)
Keep this wizard page open - you'll return to it after configuring Azure.
### STEP 2: Copy Service Provider Information
The wizard displays three values you'll need for Azure configuration:
1. SP Metadata URL (XML) - Optional, not needed for manual configuration
2. SP ACS URL - Copy this URL (example: `https://api.descope.com/v1/auth/saml/acs?projectid=.`..)
3. SP Entity ID - Copy this value (example: `P2elfCFOKeJZmUUew3cnaeXe4bE4-Ascentive-5XQRv`)
Keep this wizard page open - you'll return to it after configuring Azure.
 ### STEP 3: Configure Azure AD
**1. Create Enterprise Application**
* Open **Azure Portal**
* Navigate to **Microsoft Entra ID** (formerly Azure Active Directory)
* Click **Enterprise applications** in the left sidebar
* Click + **New application**
* Click + **Create your own application**
* Enter application name
* Select: **"Integrate any other application you don't find in the gallery (Non-gallery)"**
* Click **Create**
**2. Configure SAML Single Sign-On**
* In your Enterprise Application, click Single sign-on in the left sidebar
* Click the **SAML** tile
* In **Section 1: Basic SAML Configuration**, click **Edit**
* Enter the values you copied from the wizard:
* **Identifier (Entity ID):** Paste the SP Entity ID from the wizard
* **Reply URL (Assertion Consumer Service URL):** Paste the SP ACS URL from the wizard
* Click Save
**3. Configure Groups Claim**
* In Section 2: **Attributes & Claims**, click Edit
* Click + **Add a group claim**
* Configure:
* **Which groups associated with the user should be returned in the claim?** Select: **"Groups assigned to the application"**
* **Source attribute:** Select: **"Cloud-only group display names"** (sends readable names like "Admins" instead of UUIDs)
* Check: **"Customize the name of the group claim"**
* **Name**: Enter `groups`
* **Namespace**: Leave empty
* Click **Save**
**4. Copy Azure SAML Information**
* You'll need three pieces of information from Azure to enter back into the wizard:
* In **Section 4**: Set up \[Your Application], locate and copy:
* **Login URL** (example: `https://login.microsoftonline.com/[tenant-id]/saml2`)
* **Azure AD Identifier** (example: `https://sts.windows.net/[tenant-id]/`)
* In Section 3: **SAML Certificates:**
* Click **Download** next to **Certificate (Base64)**
* Open the downloaded `.cer` file in a text editor
* Copy the entire certificate content (including `----BEGIN CERTIFICATE-----` and `----END CERTIFICATE-----`)
* **Keep these three values ready** - you'll paste them into the wizard next.
**5. Create Azure AD Security Groups (OPTIONAL)**
* Go back to **Microsoft Entra ID** (use breadcrumb or search)
* Click **Groups** in the left sidebar
* Click **+ New group**
* Configure:
* **Group type:** Security
* **Group name:** Enter a role name (e.g., "Admins", "Users", "Viewers")
* **Members**: Add users who should have this role
* Click **Create**
* **Repeat** for each role you need in your application
**6. Assign Users and Groups to Application**
* Go to **Enterprise applications** → Your application
* Click **Users and groups** in the left sidebar
* **Assign individual users:**
* Click **+ Add user/group**
* Click **Users** → Click **None Selected**
* Search for and select your users
* Click **Select** → Click **Assign**
* **Assign groups:**
* Click **+ Add user/group** again
* Click **Groups** → Click **None Selected**
* Search for and select the security groups you created
* Click **Select** → Click **Assign**
### STEP 4: Return to SSO Setup Wizard
Go back to the wizard (should still be open) and click Continue to proceed to the Identity Provider Information screen.
#### Enter Azure SAML Details
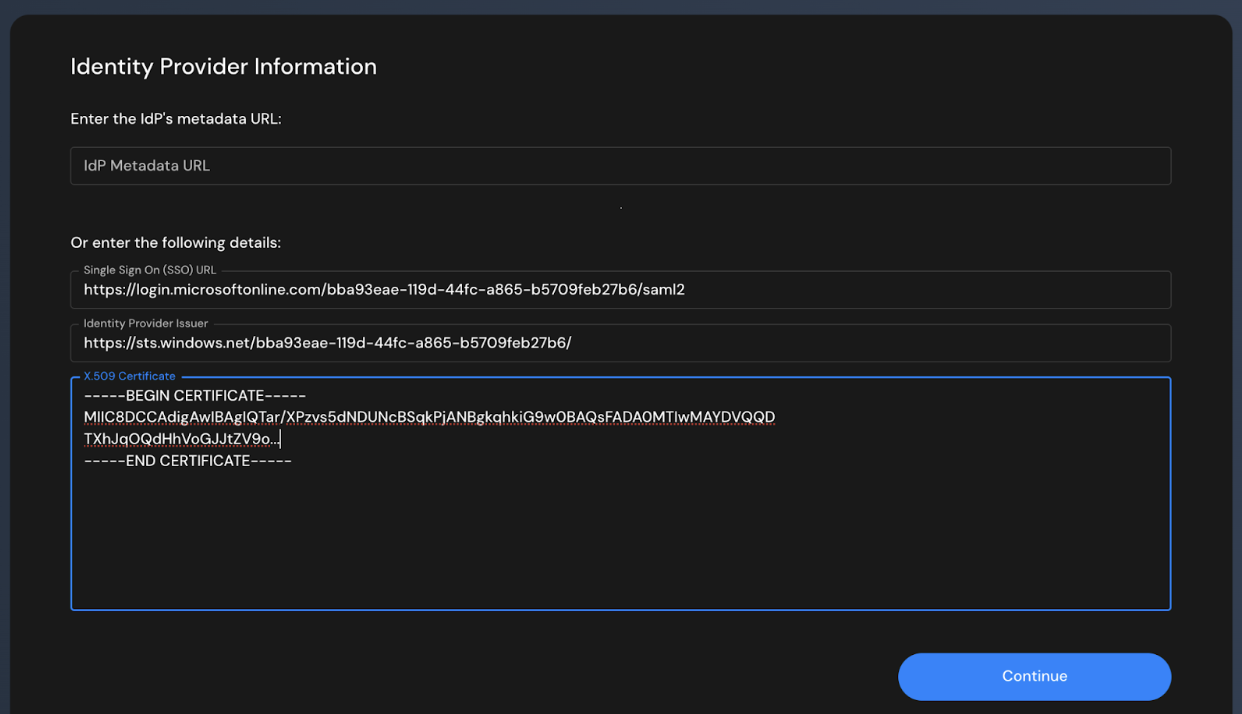
1. **Skip the "IdP Metadata URL" field** - leave it empty
2. **Enter the following details manually:**
* **Single Sign On (SSO) URL:** Paste the Login URL from Azure
* **Identity Provider Issuer:** Paste the Azure AD Identifier from Azure
* **X.509 Certificate:** Paste the entire certificate content you copied from the downloaded file
3. Click **Continue**
### STEP 3: Configure Azure AD
**1. Create Enterprise Application**
* Open **Azure Portal**
* Navigate to **Microsoft Entra ID** (formerly Azure Active Directory)
* Click **Enterprise applications** in the left sidebar
* Click + **New application**
* Click + **Create your own application**
* Enter application name
* Select: **"Integrate any other application you don't find in the gallery (Non-gallery)"**
* Click **Create**
**2. Configure SAML Single Sign-On**
* In your Enterprise Application, click Single sign-on in the left sidebar
* Click the **SAML** tile
* In **Section 1: Basic SAML Configuration**, click **Edit**
* Enter the values you copied from the wizard:
* **Identifier (Entity ID):** Paste the SP Entity ID from the wizard
* **Reply URL (Assertion Consumer Service URL):** Paste the SP ACS URL from the wizard
* Click Save
**3. Configure Groups Claim**
* In Section 2: **Attributes & Claims**, click Edit
* Click + **Add a group claim**
* Configure:
* **Which groups associated with the user should be returned in the claim?** Select: **"Groups assigned to the application"**
* **Source attribute:** Select: **"Cloud-only group display names"** (sends readable names like "Admins" instead of UUIDs)
* Check: **"Customize the name of the group claim"**
* **Name**: Enter `groups`
* **Namespace**: Leave empty
* Click **Save**
**4. Copy Azure SAML Information**
* You'll need three pieces of information from Azure to enter back into the wizard:
* In **Section 4**: Set up \[Your Application], locate and copy:
* **Login URL** (example: `https://login.microsoftonline.com/[tenant-id]/saml2`)
* **Azure AD Identifier** (example: `https://sts.windows.net/[tenant-id]/`)
* In Section 3: **SAML Certificates:**
* Click **Download** next to **Certificate (Base64)**
* Open the downloaded `.cer` file in a text editor
* Copy the entire certificate content (including `----BEGIN CERTIFICATE-----` and `----END CERTIFICATE-----`)
* **Keep these three values ready** - you'll paste them into the wizard next.
**5. Create Azure AD Security Groups (OPTIONAL)**
* Go back to **Microsoft Entra ID** (use breadcrumb or search)
* Click **Groups** in the left sidebar
* Click **+ New group**
* Configure:
* **Group type:** Security
* **Group name:** Enter a role name (e.g., "Admins", "Users", "Viewers")
* **Members**: Add users who should have this role
* Click **Create**
* **Repeat** for each role you need in your application
**6. Assign Users and Groups to Application**
* Go to **Enterprise applications** → Your application
* Click **Users and groups** in the left sidebar
* **Assign individual users:**
* Click **+ Add user/group**
* Click **Users** → Click **None Selected**
* Search for and select your users
* Click **Select** → Click **Assign**
* **Assign groups:**
* Click **+ Add user/group** again
* Click **Groups** → Click **None Selected**
* Search for and select the security groups you created
* Click **Select** → Click **Assign**
### STEP 4: Return to SSO Setup Wizard
Go back to the wizard (should still be open) and click Continue to proceed to the Identity Provider Information screen.
#### Enter Azure SAML Details
1. **Skip the "IdP Metadata URL" field** - leave it empty
2. **Enter the following details manually:**
* **Single Sign On (SSO) URL:** Paste the Login URL from Azure
* **Identity Provider Issuer:** Paste the Azure AD Identifier from Azure
* **X.509 Certificate:** Paste the entire certificate content you copied from the downloaded file
3. Click **Continue**
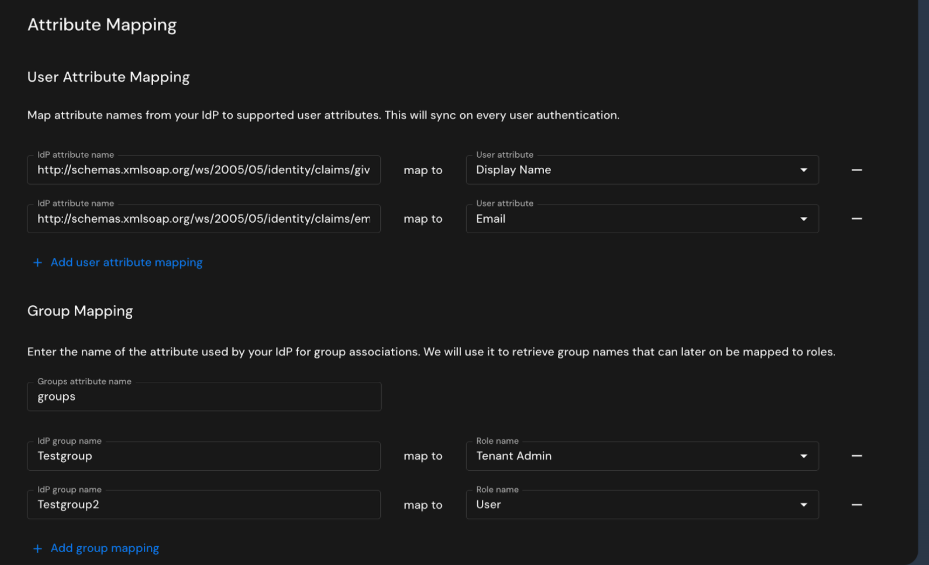
 ### STEP 5: Configure Attribute Mapping
#### Map User Attributes
You should see default mappings. Verify or configure:
| IdP Attribute Name | User Attribute |
| ---------------------------------------------------------------------------------------------------------------------------------------- | ---------------------------- |
| [http://schemas.xmlsoap.org/ws/2005/05/identity/claims/emailaddress](http://schemas.xmlsoap.org/ws/2005/05/identity/claims/emailaddress) | Email |
| [http://schemas.xmlsoap.org/ws/2005/05/identity/claims/givenname](http://schemas.xmlsoap.org/ws/2005/05/identity/claims/givenname) | Given Name (or Display Name) |
| [http://schemas.xmlsoap.org/ws/2005/05/identity/claims/surname](http://schemas.xmlsoap.org/ws/2005/05/identity/claims/surname) | Family Name |
*These are Azure AD's default SAML claim names - they may be different in your case*
#### Map Groups to Roles
1. **Groups attribute name:** Verify it shows `groups` (should be pre-filled)
2. **Add group mappings:** For each Azure AD group you created, map it to an application role:
| IdP Group Name | Role Name |
| -------------- | --------- |
| Admins | Admin |
| Users | User |
| Viewers | Viewer |
1. Use the exact group names from Azure (e.g., "Admins", "Users") - these are case-sensitive
2. If you need additional mappings, click + **Add group mapping**
3. Click Continue
### STEP 5: Configure Attribute Mapping
#### Map User Attributes
You should see default mappings. Verify or configure:
| IdP Attribute Name | User Attribute |
| ---------------------------------------------------------------------------------------------------------------------------------------- | ---------------------------- |
| [http://schemas.xmlsoap.org/ws/2005/05/identity/claims/emailaddress](http://schemas.xmlsoap.org/ws/2005/05/identity/claims/emailaddress) | Email |
| [http://schemas.xmlsoap.org/ws/2005/05/identity/claims/givenname](http://schemas.xmlsoap.org/ws/2005/05/identity/claims/givenname) | Given Name (or Display Name) |
| [http://schemas.xmlsoap.org/ws/2005/05/identity/claims/surname](http://schemas.xmlsoap.org/ws/2005/05/identity/claims/surname) | Family Name |
*These are Azure AD's default SAML claim names - they may be different in your case*
#### Map Groups to Roles
1. **Groups attribute name:** Verify it shows `groups` (should be pre-filled)
2. **Add group mappings:** For each Azure AD group you created, map it to an application role:
| IdP Group Name | Role Name |
| -------------- | --------- |
| Admins | Admin |
| Users | User |
| Viewers | Viewer |
1. Use the exact group names from Azure (e.g., "Admins", "Users") - these are case-sensitive
2. If you need additional mappings, click + **Add group mapping**
3. Click Continue
 ### STEP 6: Configure SSO Domains
1. Enter your organization's email domains (e.g., `yourcompany.com`)
2. Users with emails from these domains will automatically be routed to Azure AD SSO
3. Click **Continue**
### STEP 7: Test the Configuration
1. Click **Test** button
2. You will be redirected to the Microsoft login page
3. Sign in with an Azure AD account that:
* Is assigned to the application
* Is a member of at least one assigned group
4. After successful authentication, you should be redirected back to the application
### Verify the Configuration
After a successful test:
1. Check that you can access the application
2. Verify your user has the correct role(s) based on Azure AD group membership
3. Try logging in with different users from different groups to verify role mapping
### STEP 6: Configure SSO Domains
1. Enter your organization's email domains (e.g., `yourcompany.com`)
2. Users with emails from these domains will automatically be routed to Azure AD SSO
3. Click **Continue**
### STEP 7: Test the Configuration
1. Click **Test** button
2. You will be redirected to the Microsoft login page
3. Sign in with an Azure AD account that:
* Is assigned to the application
* Is a member of at least one assigned group
4. After successful authentication, you should be redirected back to the application
### Verify the Configuration
After a successful test:
1. Check that you can access the application
2. Verify your user has the correct role(s) based on Azure AD group membership
3. Try logging in with different users from different groups to verify role mapping